使用硬件:Google Nexus S,北京大学学生卡。(ps:笔者本想使用公交一卡通进行测试,发现手机不能正确识别)
手机操作系统:Android ICS 4.04。
开发时,笔者从Google Play Store上下载了NFC TagInfo软件进行对比学习。所以我们可以使用任意一张能被TagInfo软件正确识别的卡做测试。
在Android NFC 应用中,Android手机通常是作为通信中的发起者,也就是作为各种NFC卡的读写器。Android对NFC的支持主要在 android.nfc 和android.nfc.tech 两个包中。
android.nfc 包中主要类如下:
NfcManager 可以用来管理Android设备中指出的所有NFCAdapter,但由于大部分Android设备只支持一个NFC Adapter,所以一般直接调用getDefaultAapater来获取手机中的Adapter。
NfcAdapter 相当于一个NFC适配器,类似于电脑装了网络适配器才能上网,手机装了NfcAdapter才能发起NFC通信。
NDEF: NFC Data Exchange Format,即NFC数据交换格式。
NdefMessage 和NdefRecord NDEF 为NFC forum 定义的数据格式。
Tag 代表一个被动式Tag对象,可以代表一个标签,卡片等。当Android设备检测到一个Tag时,会创建一个Tag对象,将其放在Intent对象,然后发送到相应的Activity。
android.nfc.tech 中则定义了可以对Tag进行的读写操作的类,这些类按照其使用的技术类型可以分成不同的类如:NfcA, NfcB, NfcF,以及MifareClassic 等。其中MifareClassic比较常见。
在本次实例中,笔者使用北京大学学生卡进行数据读取测试,学生卡的TAG类型为MifareClassic。
AndroidManifest.xml:
- <span style=“font-size:16px;”><?xml version=“1.0” encoding=“utf-8”?>
- <manifest xmlns:android=“http://schemas.android.com/apk/res/android”
- package=“org.reno”
- android:versionCode=“1”
- android:versionName=“1.0” >
- <uses-permission android:name=“android.permission.NFC” />
- <uses-sdk android:minSdkVersion=“14” />
- <uses-feature android:name=“android.hardware.nfc” android:required=“true” />
- <application
- android:icon=“@drawable/ic_launcher”
- android:label=“@string/app_name” >
- <activity
- android:name=“org.reno.Beam”
- android:label=“@string/app_name”
- android:launchMode=“singleTop” >
- <intent-filter>
- <action android:name=“android.intent.action.MAIN” />
- <category android:name=“android.intent.category.LAUNCHER” />
- </intent-filter>
- <intent-filter>
- <action android:name=“android.nfc.action.TECH_DISCOVERED” />
- </intent-filter>
- <meta-data
- android:name=“android.nfc.action.TECH_DISCOVERED”
- android:resource=“@xml/nfc_tech_filter” />
- </activity>
- </application>
- </manifest>
- </span>
res/xml/nfc_tech_filter.xml:
<resources
xmlns:xliff=“urn:oasis:names:tc:xliff:document:1.2”>
<tech-list>
<tech>android.nfc.tech.MifareClassic</tech>
</tech-list>
</resources>
<uses-permission
android:name=“android.permission.NFC”
/>
<uses-feature
android:name=“android.hardware.nfc”
android:required=“true”
/>
表示会使用到硬件的NFC功能。并且当用户在Google Play Store中搜索时,只有带有NFC功能的手机才能够搜索到本应用。
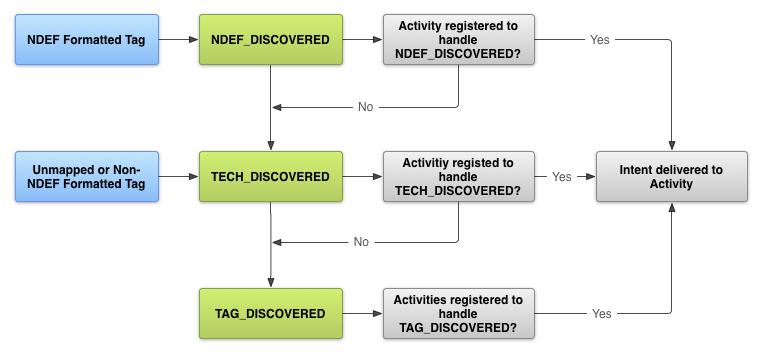
当手机开启了NFC,并且检测到一个TAG后,TAG分发系统会自动创建一个封装了NFC TAG信息的intent。如果多于一个应用程序能够处理这个intent的话,那么手机就会弹出一个框,让用户选择处理该TAG的Activity。TAG分发系统定义了3中intent。按优先级从高到低排列为:
NDEF_DISCOVERED, TECH_DISCOVERED, TAG_DISCOVERED
当Android设备检测到有NFC Tag靠近时,会根据Action申明的顺序给对应的Activity 发送含NFC消息的 Intent。
此处我们使用的intent-filter的Action类型为TECH_DISCOVERED从而可以处理所有类型为ACTION_TECH_DISCOVERED并且使用的技术为nfc_tech_filter.xml文件中定义的类型的TAG。
详情可查看http://developer.android.com/guide/topics/nfc/nfc.html说明。下图为当手机检测到一个TAG时,启用Activity的匹配过程。
res/layout/main.xml
- <?xml version=“1.0” encoding=“utf-8”?>
- <LinearLayout xmlns:android=“http://schemas.android.com/apk/res/android”
- android:layout_width=“fill_parent”
- android:layout_height=“fill_parent”
- android:orientation=“vertical” >
- <ScrollView
- android:id=“@+id/scrollView”
- android:layout_width=“fill_parent”
- android:layout_height=“fill_parent”
- android:background=“@android:drawable/edit_text” >
- <TextView
- android:id=“@+id/promt”
- android:layout_width=“fill_parent”
- android:layout_height=“wrap_content”
- android:scrollbars=“vertical”
- android:singleLine=“false”
- android:text=“@string/info” />
- </ScrollView>
- </LinearLayout>
定义了Activity的布局:只有一个带有滚动条的TextView用于显示从TAG中读取的信息。
res/values/strings.xml
- <?xml version=“1.0” encoding=“utf-8”?>
- <resources>
- <string name=“app_name”>NFC测试</string>
- <string name=“info”>扫描中。。。</string>
- </resources>
src/org/reno/Beam.java
- package org.reno;
- import android.app.Activity;
- import android.content.Intent;
- import android.nfc.NfcAdapter;
- import android.nfc.Tag;
- import android.nfc.tech.MifareClassic;
- import android.os.Bundle;
- import android.widget.TextView;
- public class Beam extends Activity {
- NfcAdapter nfcAdapter;
- TextView promt;
- @Override
- public void onCreate(Bundle savedInstanceState) {
- super.onCreate(savedInstanceState);
- setContentView(R.layout.main);
- promt = (TextView) findViewById(R.id.promt);
- // 获取默认的NFC控制器
- nfcAdapter = NfcAdapter.getDefaultAdapter(this);
- if (nfcAdapter == null) {
- promt.setText(“设备不支持NFC!”);
- finish();
- return;
- }
- if (!nfcAdapter.isEnabled()) {
- promt.setText(“请在系统设置中先启用NFC功能!”);
- finish();
- return;
- }
- }
- @Override
- protected void onResume() {
- super.onResume();
- //得到是否检测到ACTION_TECH_DISCOVERED触发
- if (NfcAdapter.ACTION_TECH_DISCOVERED.equals(getIntent().getAction())) {
- //处理该intent
- processIntent(getIntent());
- }
- }
- //字符序列转换为16进制字符串
- private String bytesToHexString(byte[] src) {
- StringBuilder stringBuilder = new StringBuilder(“0x”);
- if (src == null || src.length <= 0) {
- return null;
- }
- char[] buffer = new char[2];
- for (int i = 0; i < src.length; i++) {
- buffer[0] = Character.forDigit((src[i] >>> 4) & 0x0F, 16);
- buffer[1] = Character.forDigit(src[i] & 0x0F, 16);
- System.out.println(buffer);
- stringBuilder.append(buffer);
- }
- return stringBuilder.toString();
- }
- /**
- * Parses the NDEF Message from the intent and prints to the TextView
- */
- private void processIntent(Intent intent) {
- //取出封装在intent中的TAG
- Tag tagFromIntent = intent.getParcelableExtra(NfcAdapter.EXTRA_TAG);
- for (String tech : tagFromIntent.getTechList()) {
- System.out.println(tech);
- }
- boolean auth = false;
- //读取TAG
- MifareClassic mfc = MifareClassic.get(tagFromIntent);
- try {
- String metaInfo = “”;
- //Enable I/O operations to the tag from this TagTechnology object.
- mfc.connect();
- int type = mfc.getType();//获取TAG的类型
- int sectorCount = mfc.getSectorCount();//获取TAG中包含的扇区数
- String typeS = “”;
- switch (type) {
- case MifareClassic.TYPE_CLASSIC:
- typeS = “TYPE_CLASSIC”;
- break;
- case MifareClassic.TYPE_PLUS:
- typeS = “TYPE_PLUS”;
- break;
- case MifareClassic.TYPE_PRO:
- typeS = “TYPE_PRO”;
- break;
- case MifareClassic.TYPE_UNKNOWN:
- typeS = “TYPE_UNKNOWN”;
- break;
- }
- metaInfo += “卡片类型:” + typeS + “\n共” + sectorCount + “个扇区\n共”
- + mfc.getBlockCount() + “个块\n存储空间: “ + mfc.getSize() + “B\n”;
- for (int j = 0; j < sectorCount; j++) {
- //Authenticate a sector with key A.
- auth = mfc.authenticateSectorWithKeyA(j,
- MifareClassic.KEY_DEFAULT);
- int bCount;
- int bIndex;
- if (auth) {
- metaInfo += “Sector “ + j + “:验证成功\n”;
- // 读取扇区中的块
- bCount = mfc.getBlockCountInSector(j);
- bIndex = mfc.sectorToBlock(j);
- for (int i = 0; i < bCount; i++) {
- byte[] data = mfc.readBlock(bIndex);
- metaInfo += “Block “ + bIndex + ” : “
- + bytesToHexString(data) + “\n”;
- bIndex++;
- }
- } else {
- metaInfo += “Sector “ + j + “:验证失败\n”;
- }
- }
- promt.setText(metaInfo);
- } catch (Exception e) {
- e.printStackTrace();
- }
- }
- }
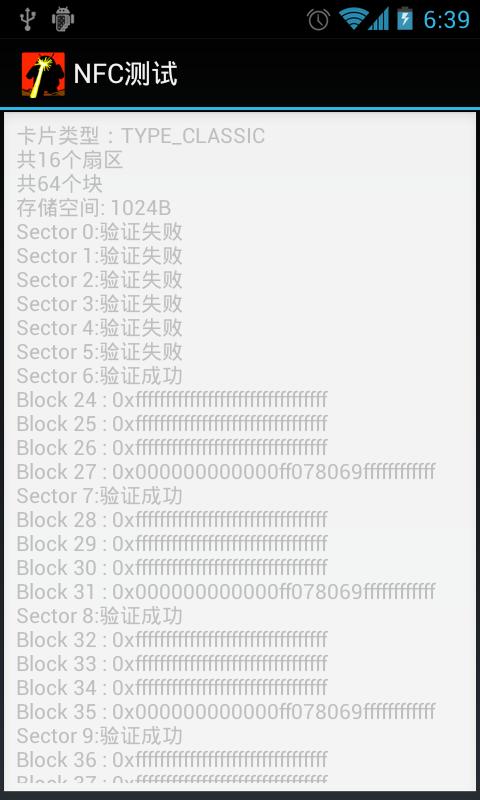
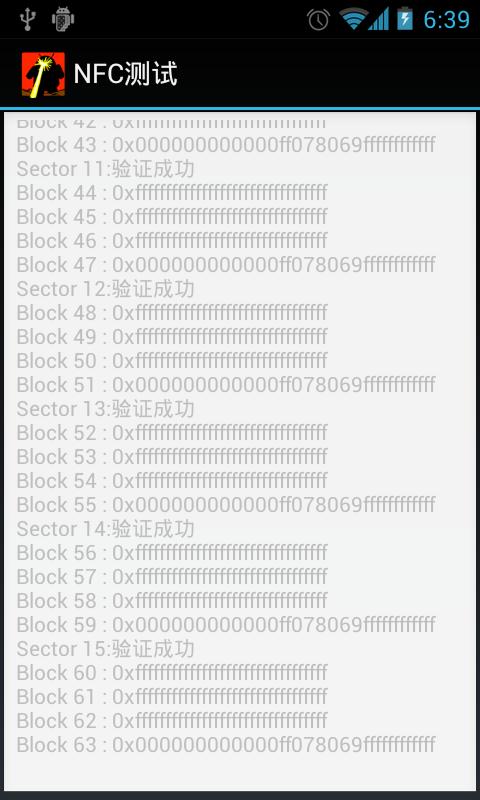
关于MifareClassic卡的背景介绍:数据分为16个区(Sector) ,每个区有4个块(Block) ,每个块可以存放16字节的数据。
每个区最后一个块称为Trailer ,主要用来存放读写该区Block数据的Key ,可以有A,B两个Key,每个Key 长度为6个字节,缺省的Key值一般为全FF或是0. 由 MifareClassic.KEY_DEFAULT 定义。
因此读写Mifare Tag 首先需要有正确的Key值(起到保护的作用),如果鉴权成功
然后才可以读写该区数据。
执行效果:

参考联接:
http://developer.android.com/guide/topics/nfc/nfc.html
http://developer.android.com/reference/android/nfc/tech/MifareClassic.html
http://www.imobilebbs.com/wordpress/?p=2822
来源URL:http://blog.csdn.net/pku_android/article/details/7430788